Monday, February 21, 2011

Jen and Tony - It's Magic!

Jen and Tony held their wedding at the Loft in Limerick. When I met with Jen, she had an idea for a very unique color pallette made up of deep red and pale yellow with accents of gray. What rose would have possibly worked any better for her bouquet than a Hocus Pocus rose? It was truly magic!

I'd like to give a big thank you to Sarah Shulte (http://www.sarahschulte.com/) for sharing her wonderful photos with me. Sarah is responsible for the first four beautiful photos. I have to admit that I did the best I could with the rest.

The second photo is a close up of Jen's beautiful bouquet which consisted of Hocus Pocus roses, yellow freesia, and yellow hypericum berries. Her stems were wrapped in a combination of burgundy and gray ribbon.

I made a contemporary boutonniere for Tony consisting of a rose, freesia, and silver aluminum wire. It added a bit of fun to his lapel.
A close up of the bridesmaid's bouquet which was made up of yellow and deep red spray roses.


Corsages were made out of yellow and red spray roses with a touch of yellow hypericum berries.

I arranged Hocus Pocus and yellow spray roses in a contemporary gray ceramic container for the placecard table.

Jen had purchased lanterns and
candelabras for her centerpieces. I enhanced the lantern with a rose sitting on cranberries in a glass container. And all the pretty candelabras needed were scattered rose petals. Jen did a really nice job with her choices. She spent a lot of time working on the details of her wedding and making it beautiful. Congratulations to the both of you!


Wednesday, February 2, 2011

Julie & Shawn - All "Buttoned" Up

Julie and Shawn were married at Bear Creek Resort in Macungie. I'd been there many years ago when it was Doe Mountain, but the resort has been completely done over and it is gorgeous. The lodge is decorated beautifully and there are so many things to do there any season of the year.

Julie chose white, green, and black as her color pallette. Black is always a challenge to incorporate into a wedding, but Julie and I were up for the task. She is extremely talented and designed so many of the details for her wedding.
That's one of the things that made this wedding so very special.

Julie's beautiful, textured bouquet was made up of white stock, green button mums, hypericum berries, and mini green cymbidium orchids. I used matching green pins to secure her ribbon wrap in place.


I used Star of Bethlehem and hypericum berries to make Shawn's boutonniere as well.
Bridesmaids' bouquets were made up of white lisianthus, green hypericum berries, and Star of Bethlehem. Star of Bethlehem was also used for the groomsmen's boutonnieres.

Moms carried small bouquets of white spray roses and hypericum berries with black ribbon wraps. Dads wore white spray rose boutonnieres.


The ceremony took place outside, up the hill from the lodge. I decorated both corners of the black arch with sprays of white cremones, orchids, roses, and green cockscomb. White bows and streamers were attached to the aisle chairs on the parents' rows.


Cocktail tables were simply decorated with green acrylic mint julep cups filled with white hydrangea and green hypericum berries.


I designed an arrangement for Julie's sign-in table that incorporated stock, hydrangea, equisetum, mums, and cymbidium orchids in a black square vase.


Julie wanted to use square glass vases for her centerpieces and we designed three different types of arrangements that did just that. The first one really represented "buttons" in this wedding. I lined each of these glass vases with green equisetum (little bamboo). I used green "button" mums scattered throughout white hydrangea. I suggested that Julie layer black, white, and green buttons on wire to bring some black into these centerpieces. She did a fantastic job and I think that the buttons are certainly a unique touch. This is one of my favorite centerpieces ever!


The insides of the glass squares used for the second centerpiece design were filled with black bubbles. I lined the rim with green cushion mums while dendrobium orchids and bear grass sprouted from the center. I put small black beads on each of the blades of grass.


The third type of centerpiece was decorated by an "M", the initial of the couples' married name, crossstitched by Julie and accented by black ribbon. I also used the ribbon to create black "tails" in the green hydrangea mixed with button mums.


I designed the sweetheart table to coordinate with the rest of the guest centerpieces. Julie used the couple's monogram to stitch on the three vases which contained a mix of hydrangea and button mums.


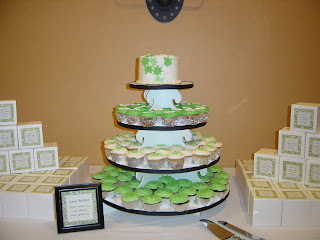
Guests were sent home with a cupcake in a box designed by Julie. What I loved about this cupcake tower was the "little cake" on top! While having an untraditional wedding "cake", the bride and groom were still able to have the traditional cutting of the cake ceremony. The best of both worlds.

Sunday, January 23, 2011

Whitney & Tom - A Plethora of Color!

Whitney wanted lots and lots of bright color everywhere for her wedding at La Massaria. However, she wanted her bouquet to be a bit more subdued and have all that color surround her. Whitney's bouquet was made up of mini white calla lilies, purple lisianthus, stephanotis with crystals inside, and white roses. She wore a beautiful gardenia in her hair. Her husband Don wore a Picasso calla lily on his lapel.


Bridesmaids carried colorful bouquets of lilies, sunflowers, stock, zinnias, and mums. Groomsmen's boutonnieres were made up of stock and green mums wrapped in orange ribbon.


Large arrangements in urns sat on pedestals sat on each side of the front of the aisle for the ceremony.


Colorful carnations and bows decorated the chairs along the aisle path.


I made a colorful topiary, which sat on a pedastal, for each side of the back of the aisle. This was a special request by Whitney.


A different color wire was used to wrap each of the vases that sat on the cocktail tables. I placed a Circus rose in each.


I placed layers of sisal inside a vase and coordinated an arrangement of brightly colored flowers and ting ting on top of the piece that sat on the placecard table.


I designed three different types of centerpices of the guest tables. All of them used brightly colored flowers, glass squares, and colorful acrylics in the base. The first group of tables were "tablescaped". I used three differently sized squares, each filled with one type/color of flower. Votives in glass squares surrounded each centerpiece.


The second group of centerpieces were made up of a mass of one color and type of flower along with matching acrylics.

There were five different flowers/colors on the guest tables.


The third type of centerpiece incorporated a variety of brightly colored flowers set upon a tall glass vase. Inside each container was a stem of larkspur set in clear acrylics.


I decorated the corners of the square layered wedding cake with "bits and pieces" of a variety of flowers. The "N" at the top stands for Nye - the last name of the happy couple.

Thursday, January 6, 2011

Pirate Party - Yo Ho Ho!

Whitney and Don celebrated their rehearsal with a dinner at the Desmond Hotel. They chose a pirate theme of purple and gold. The reason was simple - they attended the same college where their colors were purple and gold and the mascot was a pirate! Whitney's favors were treasure chests of chocolate. I filled the large chests with alstromeria and carnations, gold beads, and gold pirate coins. Each chest featured a different pirate element. Looks like I forgot to photograph the spyglass! I had as much fun shopping for this party as I did designing the arrangements. What a great idea Whitney!


Tuesday, December 14, 2010

Centerpieces for the DEC Christmas Party

This year Whimsical Welcomes was honored to donate the centerpieces for the Christmas luncheon at Marjeanes for the workers (and their families) from the Developmental Enterprises Corp. - North Penn Training Center. I'd like to introduce you to Bill, a member of our family - who used to work at that workshop, but always attends the party with Glenn's Aunt Carolyn. A good time was had by all. Next year I hope to be able to attend the party too, if I don't have another wedding to prep for. I hear the DJ rocked and everybody loved the dancing! I thought you might enjoy seeing some of the arrangements that we made for the party.


This is a red sleigh that I filled with flowers so that Bill could bring a little bit of Christmas back to his group home.


Several people had given me a variety of baskets. I painted them all red and then decorated each of them differently with ribbon and all sorts of cute decorations - presents, sleds, sparkle.... Each basket was later filled with a variety of winter greens and flowers. We had a great time making these for the party.


I couldn't have taken on this project without the help of Sue L. - who helped me decorate and deliver all of the baskets - and Kathy F. - who helped me arrange all of the flowers. The centerpieces were given away as prizes. It was so much fun that we're definitely going to do it again next year!


And finally, an arrangement that I made for Glenn's Aunt Carolyn, as a gift, that sat on the gift table. Happy Holidays everyone!

Sunday, December 5, 2010

How To Holiday Centerpiece

Here is an example of a centeriece that I've previously made. But holiday centerpieces don't have to be difficult to make yourself. Cute and easy works just as well. I've written down directions for a centerpiece that I made sitting in the front of the picture below. Please let me know if you have any questions.
Happy Holidays to All!!


1. Purchase an 8" round glass bowl. Michaels has them.

2. Add stick on dots in a pattern around the bowl. Choose from white, green, or red. You can find them in Staples or in the office supply section of Walmart.

3. You'll need at least 15 carnations to fill in the top. Arrange the first layer in a circle so that the heads lay right on the rim of the bowl. Fill in the next layer of carnations against them and finally fill in the center. You can use red, white, or peppermint carnations. They normally come in bundles of 25. Allow them time to warm up after you bring them home and "fluff" out the petals. Carnation stems will snap if you work with them when cold.

4. Add a few drops of food coloring to dye your water either red or green. It won't hurt the flowers. If you have a package of flower food, add it now. If not, a tablespoon of non-flavored Listerine will work.

5. Finally, buy some small Christmas tree balls. You'll need to attach them - with a hot glue gun - to a dowel or stick of some type. I've used wooden sticks that are sold for shishkebob. If you buy balls that are attached to a wire - wrap the wire around the stick to stabilize it more. Insert the balls among the carnations. Centerpiece done! You can also do this for Chanukah with white dots, blue water, white carnations and blue balls. Perfect!

Let me know how they turn out! I'd love to see pictures.